Leaderboard
-
Matt
Administrator144Points1,562Posts -
MidnightWatcher
Member32Points124Posts -

NightWatcherTheater
Member23Points68Posts -

Polargeek
Member13Points54Posts


Popular Content
Showing content with the highest reputation since 02/03/2023 in Posts
-
4 pointsI will be working on some site updated over the holidays. It may be a little bumpy during the process.4 points
-
4 pointsGood News: The creator of the Rapier skin has just put out a new development version. Rapier v13.0.14 now includes support for PreShow Experience. You can download the development add-on repository here: https://kodi.wiki/view/Add-on:Rapier#Development_version_.2F_Gade.27s_Add-on_Repository4 points
-
Hey @Quebert . Welcome back. It's always great to hear from people that enjoy PreShow, and the versions prior to it. The conditions were developed by the person before me. An upcoming versions of PreShow will include metadata so that you can display more relevant trivia. The goal is to create the conditions at the content level instead of at the sequence level so that you can use 1 sequence for a wide variety of content. More specifically, the 1st version will look at rating and genres and deliver content that is a better match to your movie. For example, if you are watching an R rated horror movie you won't be getting Pixar trivia, and vice versa. The latest version of PreShow in the repo already includes the 1st version of metadata for video bumpers. I also have options for release year, director and cast to better refine the content, but that will be in development/testing for a long while. Thanks for your post.3 points
-
3 pointsHi, as i am currently unable to access the file system of my shieldtv for reasons i cannot explain, i can only suggest a solution. Everything else is up to the respective balster. Since I can't download the zip file of the installation either, I'll show my way here using the original Cinemavision. The paths differ only in the names. The files are (as far as I could see) the same. Trailers are provided via the so-called scraper.py files. I mainly use tmdb. So I can find my corresponding scraper under [KodiAddOn]\script.preshowexperience\lib\preshowexperience\scrapers\tmdb Open the date scraper.py with a corresponding editor (I use Notpad++) and look in the first lines for the BASE_URL This looks as follows BASE_URL = 'https://api.themoviedb.org/3/movie/{endpoint}?language=en-US&api_key=' + API_KEY I then change this to BASE_URL = 'https://api.themoviedb.org/3/movie/{endpoint}?language=en-DE&api_key=' + API_KEY Read here -> https://developer.themoviedb.org/docs/languages Save, restart Kodi and enjoy the trailers in German (or any other language). Hope that helps For all who are interrested in and are a3 points
-
3 pointsI have found a bunch of movie theater etiquitte/policy videos. Feel free to add your favorites. HITCHCOCK: Turn Your Phones Off PSA Movie Theater Courtesy | 28 | Manners Monday Mr. Bean Cinema Policy Trailer (1997) [4K] [FTD-0911] AMC Policy Trailer - Dr. Seuss' The Lorax AMC Policy Spot - Minions vs. Evil Minion - DESPICABLE ME 2 Resist the Urge - Madagascar 3 at AMC Theatres! Ice Age: Continental Drift - AMC Policy Trailer - John Leguizamo, Ray Romano, Denis Leary Epic The Movie: Cell Phone Policy Trailer AMC Theatres Policy Trailer | The Muppets Minions -- Regal Crown Club Loyalty Card -- Regal Cinemas [HD] Robots Mobile Phone Policy (2005) Parental Guidance -- In Theater Policy PSA Featuring Billy Crystal 2012 [HD] Movie Theater Etiquette Neil Hamburger Texas Theatre Policy Silence Trailer - Toy Story 3 [1080p HD] Silence Your Cell Phone! Silence Your Phone Stereo Mix Ver2 10 29 14 Silence Your Cell Phone Winner Rio 2 - Silence Your Cellphones and Use CineMode! Silence Cell Phones 2 Scary Movie | 'Shakespeare in Blood' (HD) - Regina Hall, Shawn Wayans | MIRAMAX Don't Be THAT Bird - Turn on CineMode! Don't Talk PSA | Kevin Bacon | Alamo Drafthouse Snowden | "Oliver Stone: Turn Off Your Phone PSA" Exclusive | Global Road Entertainment Santikos "Turn It Off" Cell Phone PSA Turn Off Cell Phones PSA Welcome to the cinema GEICO Theater Preview With The Gecko - Silence Your Cell Phones! (2013) Movie Theater Etiquette3 points
-
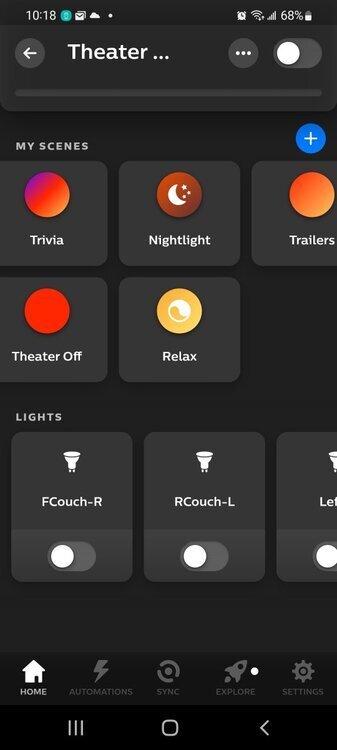
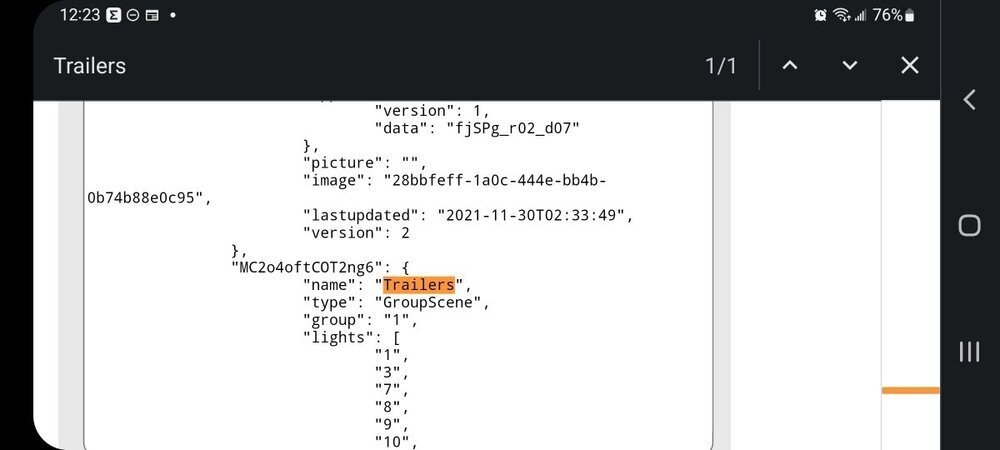
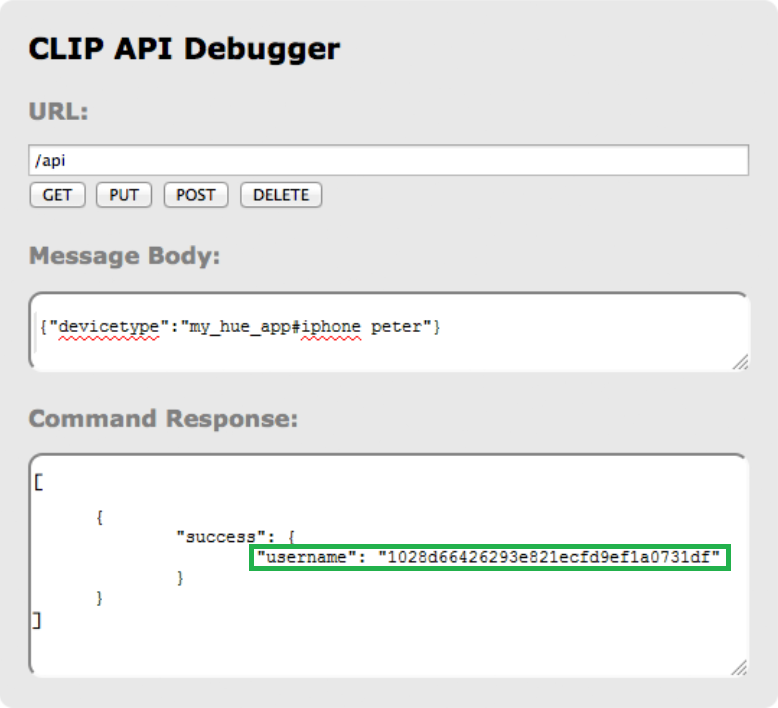
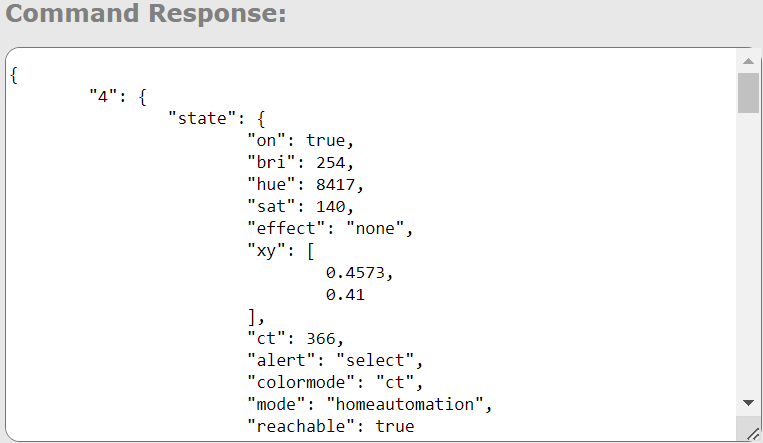
Great thread for Philips Hue users. For anyone who wants to call up scenes in your sequence, just first create the scene using the Philips Hue app and then use the action file to call up that specific scene during your sequence. I've attached a screenshot of mine, for example (I have Trivia and Trailers scenes). Here's the content of the action file that I use to activate the "Trailers" scene in the Philips Hue app just before the movie trailers: #http://<hue-bridge-ip>/api/<hue-bridge-user>/groups/<hue-light-group>/action #PUT:{"on":true,"scene":"<scene ID>","transitiontime":50} http://192.168.1.11/api/28555ae631edc91926d069d5d87f165/groups/theater room/action PUT:{"on":true,"scene":"MC2o4oftCOT2ng6","transitiontime":50} You can set the transition time to any value you like. I prefer 50. To find the "code" that identifies the Philips Hue scene you want to activate, use the debug tool. In a web browser enter: http://<bridge IP address>/debug/clip.html In the URL field of the CLIP API Debugger, enter: /api/<username> Click GET and then search (CTRL+F) for the scene you want to activate in your sequence. For example, to activate the "Trailers" scene I created in the Philips Hue app I searched for "Trailers" and the ID of the scene is "MC2o4oftCOT2ng6" (it'll be found in the Command Response window at the bottom).
 3 points
 -
Confirming this bug. Thanks for letting me know. It has now been reprogrammed to keep track of what is already disabled and to return the sequence to the state that it was prior to the preview.3 points
-
3 pointsPerfect timing. I added in a section for commercials in the video bumpers for the next version of PSE.3 points
-
3 pointsI think once PSE is added to the official Kodi repository it'll receive official support from Gade and a few others.3 points
-
The updated file is also in the alpha of the latest version in the repo.2 points
-
I'm going to release a new version of PreShow, hopefully this weekend, with a solution that should take care of this issue. I have attached the updated python file that control actions with the potential fix. The file goes in your kodi addon directory in the following folder: script.preshowexperience > lib > preshowexperience Below is a guide to where the kodi folder is. The addon folders is located inside of this, so add addons/script.preshowexperience/lib/preshowexperience to find the location where the action file goes. Android Android/data/org.xbmc.kodi/files/.kodi Flatpak ~/.var/app/tv.kodi.Kodi/data iOS /private/var/mobile/Library/Preferences/Kodi LibreELEC /storage/.kodi Linux ~/.kodi Linux (Flatpak) ~/.var/app/tv.kodi.Kodi macOS /Users/<your_user_name>/Library/Application Support/Kodi Nvidia Shield (SMB) smb://<nvidiashieldurl>/internal/Android/data/org.xbmc.kodi/files/.kodi OSMC /home/osmc/.kodi tvOS /private/var/mobile/Library/Preferences/Kodi WebOS /media/developer/apps/usr/palm/applications/org.xbmc.kodi/.kodi Windows C:\Users\<YourUsername>\AppData\Roaming\Kodi Windows Portable <Install location chosen by you>\portable_data Windows Xbox %LOCALAPPDATA%\Packages\XBMCFoundation.Kodi_4n2hpmxwrvr6p\LocalCache\Roaming\Kodi\ If you don't know hot to copy the file to this location, please wait for the updated version of PreShow that will include the change. actions.py2 points
-
2 pointsFIXED! It seemed like the Kodi App had all permissions (4 out of 4), but opening up "Storage" revealed it only had Read permission. Completely my own mistake. Hopefully, @JustRob and others might find this helpful.2 points
-
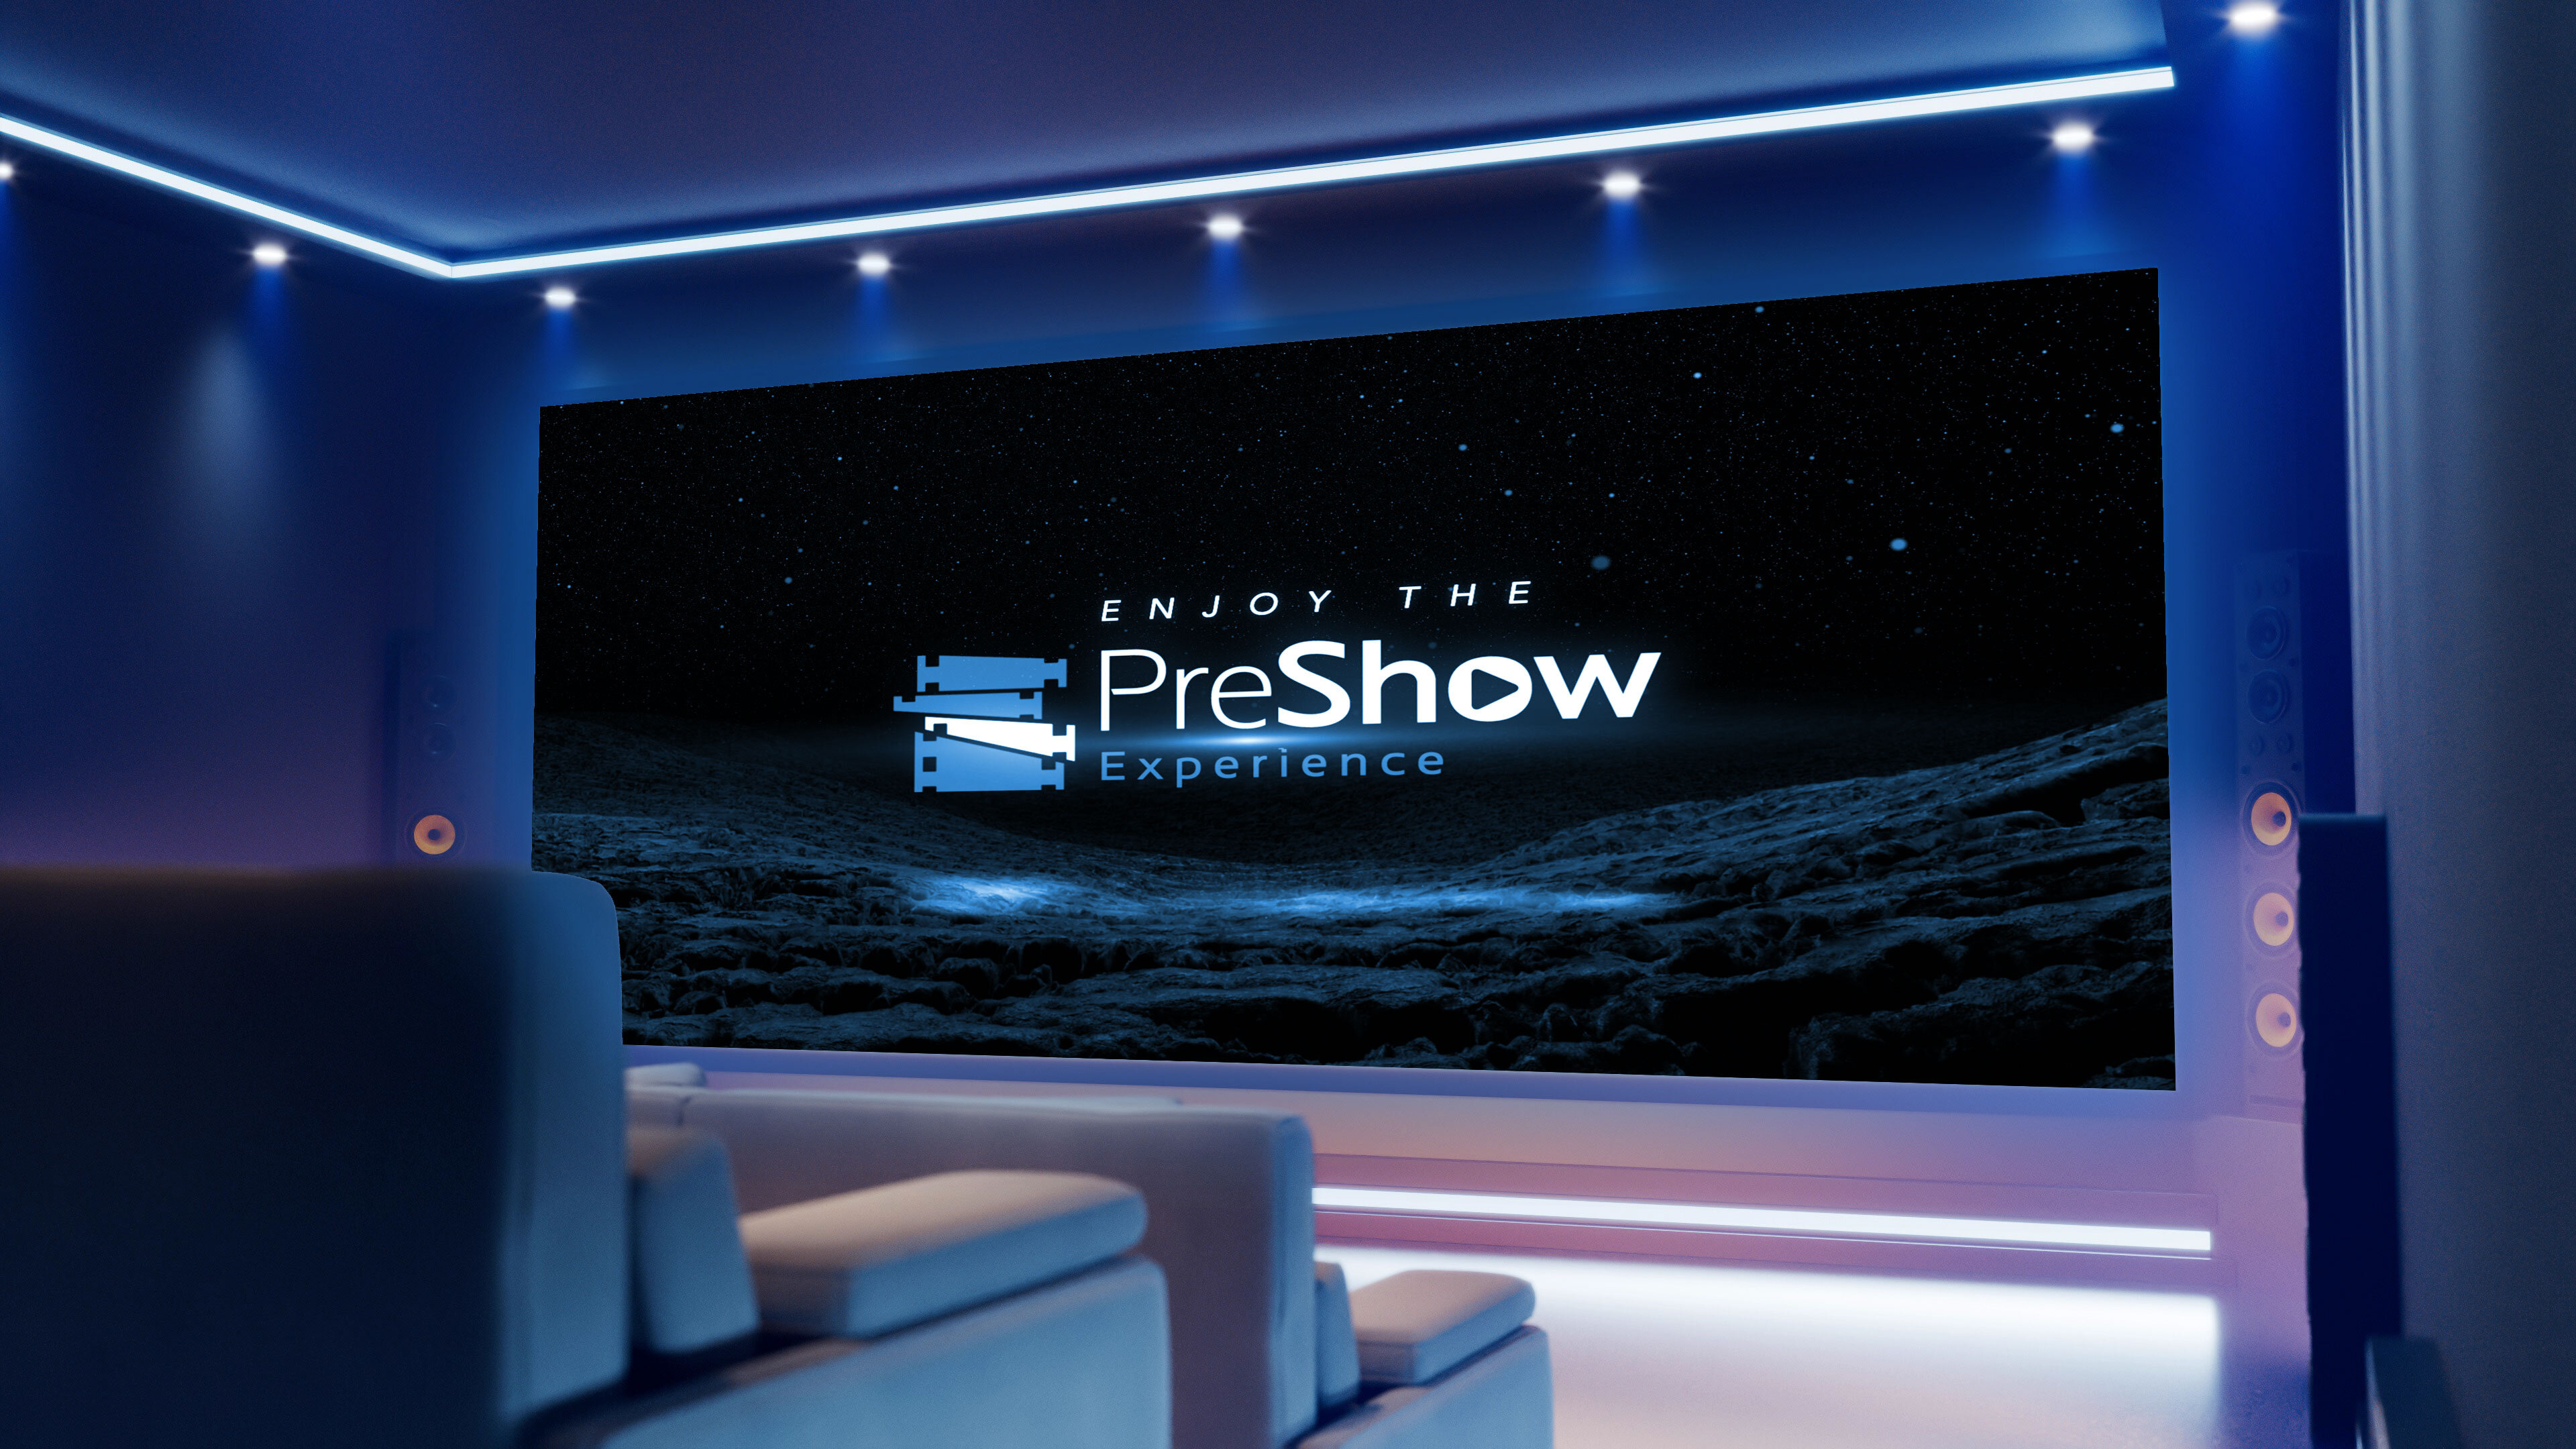
The PreShow Experience addon for Kodi. It's the #1 "wow factor" when someone sees it in action for the first time -- trivia, intros, trailers, Philips Hue lighting control. It creates a very unique home theater experience.2 points
-
2 pointsMy JVC X790 projector is behind the first row and just above the second row. I set it about 12 feet back from lens to screen to allow a 10-foot screen at the shortest throw to maximize brightness. If I ever need to replace it I'll likely get a JVC NZ500 and set it about 16 feet back to accommodate a 10-foot screen at the longest throw to maximize contrast (it'll be plenty bright).2 points
-
Digital Cinema PreShow Experience Bumper Set 4k Digital Cinema bumper set with 5.1 surround sound Videos include: Courtesy Feature Intro Feature Outro Intermission PreShow Theater Intro Theater Outro Trailers Intro Trailers Outro Trivia Intro Trivia Outro Sponsors File Information Submitter Matt Submitted 02/11/2025 Category PreShow Bumper Sets View File
 2 points
 -
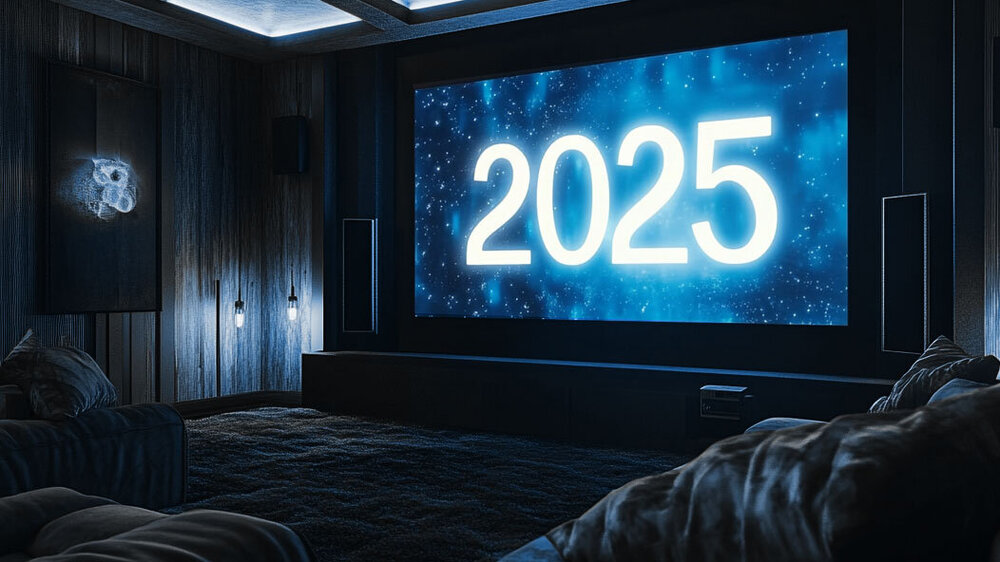
2 pointsHappy 2025 everyone. I hope you’re ringing in the new year with joy, relaxation, and maybe even a few of your favorite movies. There’s nothing like cozying up at home, diving into a great story, and sharing the magic of cinema with loved ones. Here’s to a year filled with happiness, laughter, and endless movie nights! 🍿✨ What are you most looking forward to in 2025? Let us know—we’d love to hear!
 2 points
 -
2 pointsI just watched trailers in English, German, French & Spanish. 1 important thing to note is the language is set at the point of the scan, not at playback. There's also a file stored in PreShow's data so that you can hammer the scraper, so the trailer language can't be updated quickly unless that file is deleted. In other words, you can't quickly change between languages. I went with what I think would be the 10 most common NA or European languages. This should be in the next dev or official version of PreShow. Also, I'm going to change the title of this topic since it affects other languages.2 points
-
2 pointsThanks for pointing that out @BananenTV. I think that the full list of tmdb languages include: Code Language Region ar-AE Arabic United Arab Emirates ar-SA Arabic Saudi Arabia bg-BG Bulgarian Bulgaria bn-BD Bengali Bangladesh ca-ES Catalan Spain ch-GU Chamorro Guam cs-CZ Czech Czech Republic da-DK Danish Denmark de-DE German Germany el-GR Greek Greece en-US English United States eo-EO Esperanto - es-ES Spanish Spain es-MX Spanish Mexico eu-ES Basque Spain fa-IR Persian Iran fi-FI Finnish Finland fr-CA French Canada fr-FR French France he-IL Hebrew Israel hi-IN Hindi India hu-HU Hungarian Hungary id-ID Indonesian Indonesia it-IT Italian Italy ja-JP Japanese Japan ka-GE Georgian Georgia kn-IN Kannada India ko-KR Korean South Korea lt-LT Lithuanian Lithuania ml-IN Malayalam India nb-NO Norwegian Bokmål Norway nl-NL Dutch Netherlands no-NO Norwegian Norway pl-PL Polish Poland pt-BR Portuguese Brazil pt-PT Portuguese Portugal ro-RO Romanian Romania ru-RU Russian Russia sk-SK Slovak Slovakia sl-SI Slovenian Slovenia sr-RS Serbian Serbia sv-SE Swedish Sweden ta-IN Tamil India te-IN Telugu India th-TH Thai Thailand tr-TR Turkish Turkey uk-UA Ukrainian Ukraine vi-VN Vietnamese Vietnam zh-CN Chinese China zh-TW Chinese Taiwan I'll make a setting for the language for tmdb. Anywant want to test other languages and let me know if they should be added to PreShow?2 points
-
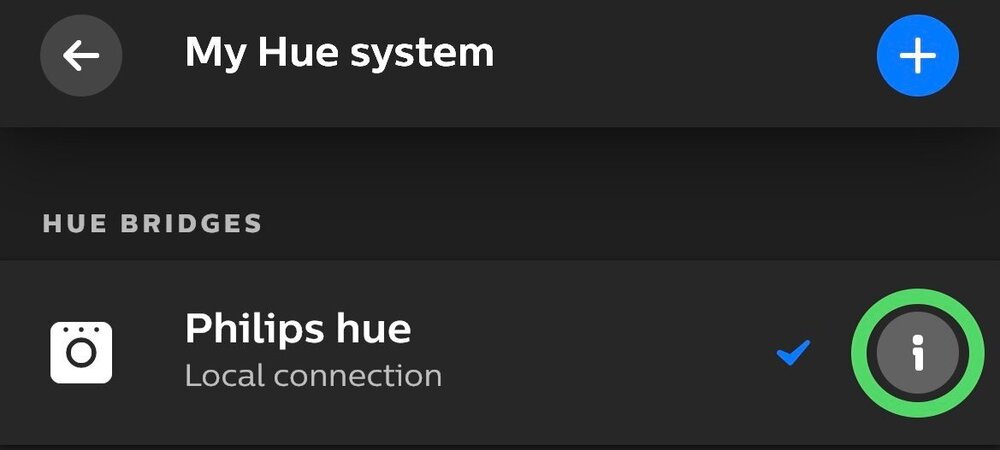
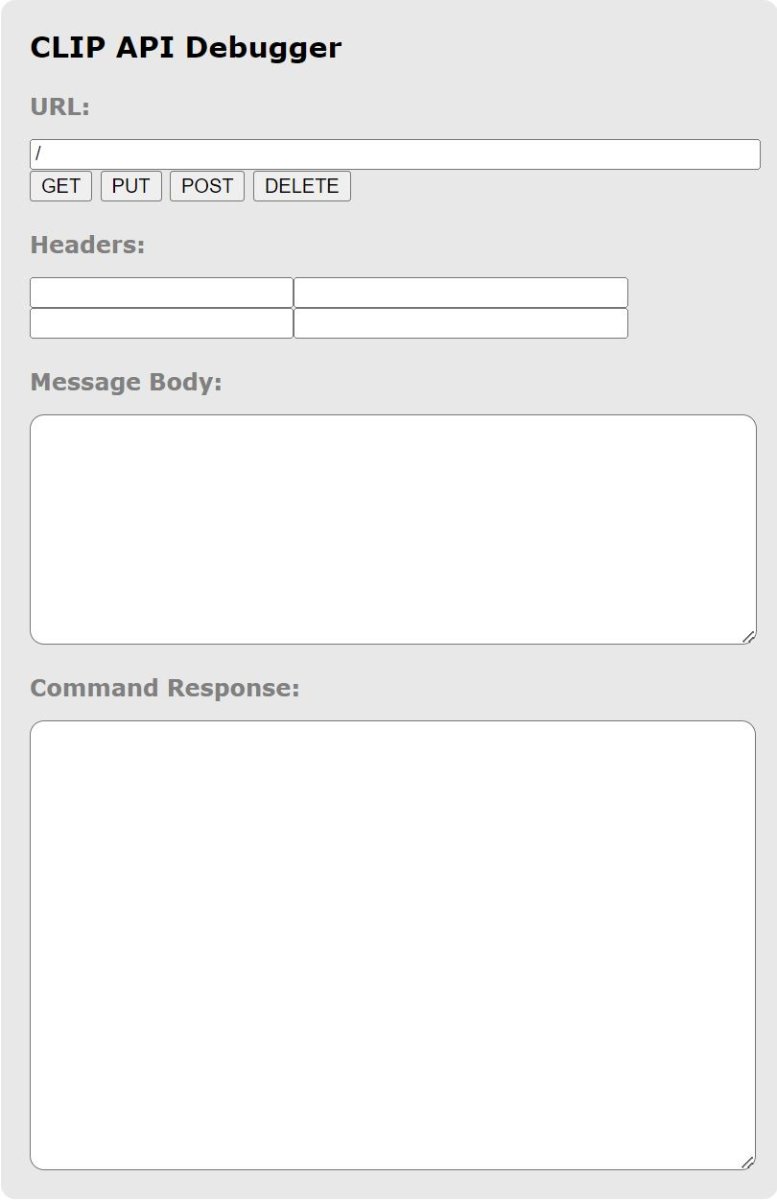
What You'll Need: Philips Hue Bridge Philips Hue lights (make sure they are already connected within the Philips Hue app) Finding Your Bridge's IP Address Tap on "Settings" in the bottom right of your app 2. Tap on "My Hue System" at the top 3. Tap on the information icon to the right of the bridge 4. Your IP address will show at the bottom Using the CLIP API Debugger 1. Now that we have the bridge's IP address you will need to make a new tab and input it into this URL: https://<bridge ip address>/debug/clip.html A Debugger interface will show up 2. We will not be able to do anything until we obtain our unique username (aka an authorized user) so input this into the debugger URL: /api Message Body: {"devicetype":"my_hue_app#iphone peter"} 3. Click on "POST" You will get back an error message which is completely normal. It's Philips Hue's way of security to prove that you have access to your bridge 4. Press the button on your bridge and click on "POST" again Congrats! You've just obtained your unique username! 5. Copy that username and paste it into Notepad (or a similar program). We'll be using it in everything we do from here on out Changing the lights (ON/OFF, Color Loop, Change Color) 1. In the debugger copy/paste this into the URL: URL: https://<bridge ip address>/api/<username>/lights 2. Click on "GET" This will show you the state of your lights. If they're on, their color (hue), their saturation (sat), their brightness level (bri) etc. 3. Now let's have some fun. Look for the light you want to change (it has a number). In this case we'll choose the first one which is number 4. Copy/paste this into the URL: URL: https://<bridge ip address>/api/<username>/lights/<light number>/state 4. Now copy/paste this into the Message Body: Message Body: {"on":true, "sat":255, "bri":255,"hue":22070,"transitiontime":20} 5. Click on "PUT" and watch the magic happen! Here are a few definitions to understand what you can change: On true = The lights will turn on false = The lights will turn off Saturation (sat) Determines how saturated you want the color you've chosen (255 is the most saturated (colored) and 0 is the least saturated (white)) Brightness (bri) Determines how bright you want your lights. You can choose from 0-255 (0 does NOT turn off the light, 255 is the brightest) Hue The color your light will show (16 million colors to choose from according to Philips Hue) Transition Time (transitiontime) This is how long it takes for the command to take place in seconds (10 = 1 second, 20 = 2 seconds etc.) Effect You can only choose one effect which is color loop. If you want to add that effect just copy/paste "effect":"colorloop" If you want to stop the effect then replace "colorloop" with "none" If you want to check out more definitions then go here. You will need to create a Philips Hue Developer account. 6. Now that you know how to check the state of your lights, you can go into your Philips Hue app, change the lights to whatever you want, then use the URL https://<bridge ip address>/api/<username>/lights to figure out their hue, saturation, and brightness. You can then use the Message Body {"on":true, "sat":255, "bri":255,"hue":22070,"transitiontime":20, "effect":"none"} and change whatever you'd like. Feel free to remove the effect statement entirely, feel free to change the transition time. The worlds your oyster! Saving Actions and Place Into PreShow Experience Now that we have a handle on how to have the lights behave the way we want to, let's save them in a format PSE can understand 1. Open Notepad (or a similar program) and copy/paste this into it: http://<bridge ip address>/api/<username>/lights/<light number>/state PUT:{"on":true, "sat":255, "bri":255,"hue":22070,"transitiontime":20} http://<bridge ip address>/api/<username>/lights/<light number>/state PUT:{"on":true, "sat":255, "bri":255,"hue":65186,"transitiontime":20} SOMETHING VERY IMPORTANT TO UNDERSTAND: Notice how the URL we are saving into Notepad DOES NOT contain an "s" in http. The debugger tool requires you have https in the URL, but PSE requires you remove the "s" from it. Keep that in mind. 2. In this scenario we are having multiple lights change. You can add as many actions as you want, but remember to have a space in between each one like the example above. I'll show you how to change an entire group after this example. 3. Change the sat, bri, hue, transitiontime and whatever else to whatever you'd like and then click Save As 4. In your title type the name of the file (name it whatever you'd like) then add the extension .pseaction. Change the file type to "All Files" 5. Place the new file you just saved into the "Actions" folder of the PSE file structure. 6. Now you can insert an action in the Sequence Editor and you can also click "Test" to see if it works. Adding Automatic Actions When You Press Pause, Resume, and Abort (Stop) 1. When you are in the PreShow Experience Sequence Editor go to the Settings Menu 2. Go to the left hand side menu and go to "Actions" at the bottom 3. This is where you can choose what action you want for when you Pause, Resume or Abort Hopefully this guide has helped to get you started. I know it's not completely comprehensive, but feel free to input your opinions, suggestions or questions! I'd love to hear what people have done, or are in need of.


 2 points
 -
@mariusGlad that you got the skin working for you. As a recommendation for everyone, if you have an addon/skin that you rely on, don't update to new versions of Kodi on your main system until you've seen that the addon/skin is compatible with it.2 points
-
The skin was updated a couple of days ago with official support for PSE: https://github.com/beatmasterRS/skin.arctic.zephyr.mod/commit/42844fc6e6434d6486747765232ad170552f2aa8 It works perfectly on Kodi 21.2 points
-
Hey @ani. Make sure that you've restarted Kodi after installing PreShow. There are 2 ways to launch PreShow. The 1st is to open the context menu and select PreShow Experience. The 2nd is to install a skin that has PreShow in it. I don't keep track of all of the skins that work with PreShow, but here are a few that have been modified: https://preshowexperience.com/files/category/7-skins/ Let me know if you have issues after trying these.

 2 points
 -
2 pointsDu musst dafür die DialogBusy Datei in deiner Kodi Skin bearbeiten. Heimkinopraxis.de hat dafür eine Anleitung. Bei manchen der zur Verfügung gestellten Skins ist es auch schon gemacht.2 points
-
2 pointsIt's currently just straight random order, so if you have 75% of your slides in 1 folder, then ~75% of what is displayed will be from that folder. The only current option is to put slides in different folders and set the trivia folder in different sequences to play them. The upcoming versions of PreShow will include some more filters and ways to differentiate what slides you are getting, and at some point I hope to get more trivia added.2 points
-
2 pointsI removed the download links for the previous dev version. I only keep them up long enough for me to get the feedback that I need. The most recent dev version is available here:2 points
-
MyScopeNox for PreShow Experience in Kodi 20 View File This is a modified version of MyScopeNox for use with PreShow Experience Submitter Matt Submitted 03/08/2023 Category Skins2 points
-
The Apple iTunes Movie Trailers site has been shut down. Because of this iTunes trailers in PreShow will no longer work. I'll post more when there is additional news.2 points
-
2 pointsSupporting Actress 1936-2022 Oscars Best Supporting Actress Winners for the years 1936-2022 Data was obtained from oscars.org and photos from tmdb.org File Information Submitter starslayer74 Submitted 12/13/2023 Category Trivia View File
 2 points
 -
2 pointsI'm getting ready to fully generate my Oscar slides. My version of Canva (free) is limited to generate at 1380x760 but I am considering upgrading to save them at a higher resolution. I'm not sure what resolution to save at, so I wanted to get some input on that. Also, since this has been a labor of love, I am considering using an online file resizer for free but I wasn't sure about quality of that vs exporting them from Canva at the higher resolution.... All total we're looking at approximately 500 slides covering Best Actor, Best Actress, Supporting Actor, Supporting Actress, and Best picture winners from the very first Oscars to 2022. I attached some examples (using dummy data on the example because I was working on mock-ups) My next project is going to be movie quotes slides but I'm struggling determining how to format those. Also a word of caution for anyone who wants to create slides: DON'T TRUST WIKIPEDIA OR AI - Neither one of them provided accurate information for Oscars data. I was cross checking my AI generated data and discovered HUGE glaring issues including years, winners names, etc. I ended up going straight to the Oscars website to get accurate information, even though it required more manual work on my side.

 2 points
 -
2 pointsPersonally, I wouldn't generate new slides at a resolution less than 1920x1080. I wish I could have created all my old slides at a higher resolution and exported them at 1080p. Because now I could re-export at 1440p or 4K At 1080p they don't look bad on a 4K display, but depending on the source material many of my old 480p and 720p slides look awful. So basically I'd create anything new at the highest possible resolution based on available source material and then export at the resolution of my display but keep the originals to update later at a higher resolution. Also, most free upscaling tools I've tried have done a pretty poor job at it, but your mileage may vary.2 points
-
2 pointsThanks for pointing that out. I was trying to fix something else on the site and it apparently broke the menu. I think it is fixed now.2 points
-
2 pointsView File Volume Normalizer Master Volume Normalizer Master This is the program i use to level the volume on my bumpers , Since i use Passthrough audio with kodi the volume adjustments in Preshow wont work with some of my bumpers so i found this to level them all to the same volume . Its convenient to use you can pick a file to match the rest of your bumpers to or pick one of the various other ways to level the volume.. The FREE version has a limit of ONE Minute of audio , But is plenty in most cases for bumpers if longer is needed You can purchase or feel feel free to contact me and i can help... Hope this program helps on keeping those rouge bumpers from popping your eardrums ... Additional info: The application can adjust audio volume in various ways. It matches the volumes of separate files. If you have several songs with different volume levels you want to write to a CD, use this software to adjust volume levels of each song so they sound similar. The target volume level can be average of all tracks, or just as same as the volume of other audio or video file. The application can also maximize volume. Each file will be amplified as loud as possible without changing its dynamic range and clipping audio track. You can also change the sound level directly, by specifying a custom dB value or percentage. Submitter NightWatcherTheater Submitted 08/22/2023 Category Other Files2 points
-
Glad you got it running. Video tutorials are definitely on the to-do list.2 points
-
2 pointsBtw. i have written to Gade, the "Father" of Rapier in the Kodi.tv forum, asking him if PSE integration would be possible. Usually he is a very competent and responsive guy. Will keep you posted on what comes back from him.2 points
-
2 pointsThere were 2 trivia packs that had incorrectly structured file names. Replace your files with the correct files below and it should work.2 points
-
2 points
-
2 points
-
PSE is 19.5 compatible. I just tried it and was able to install it without issue. Sometimes a dependency won't transfer properly at a certain time, which I think is an issue with the Kodi servers. I'll provide links to the dependencies when I get a chance so that people can manually download them if this happens. @Greg KinneyCan you try to install it again?2 points
-
2 pointsI also found a glitch of some out dated code if your having trouble with motion posters with gifs it might actually be your computers name if it has # in the name the naming is out dated and doesn't convert # to %23 so when the program makes the html file to display the gif in the program it's names the wrong file location... I think I also found away to fix the game stats but the developer said he is working on an update and I guess I should let him do his thing before doing all the work for nothing...2 points
-
2 pointsSmoke 4K Bumper Set View File 4K smoke themed bumper set with surround sound Videos include: 3D Intro 3D Outro Countdown Courtesy Feature Intro Feature Outro Intermission Theater Intro Theater Outro Trailers Intro Trailers Outro Trivia Intro Trivia Outro Sponsors PreShow Experience Submitter Matt Submitted 03/13/2023 Category Bumpers2 points
-
2 pointsI haven't tracked down the code for that link yet but I have changed the code in mine so Preshow displays instead of CinemaVision while you're playing your sequence (I'm talking about when your motion posters detects your useing CinemaVision and it's not something with a poster art attached to it like trivia for example it would display CinemaVision logo) I switched mine to Preshow2 points
-
2 pointsPage up takes you to the next module. You can keymap a button on your remote to do it. https://kodi.wiki/view/Add-on:Keymap_Editor2 points
-
2 points
-
2 points
-
2 pointsI use it for lights and everything else but i think I might be unique in i also use it to make audio announcements to the whole house like " TheThe movie preshow has begun.. dont Forget to grab some popcorn and refreshments.. NightWatcherTheater snackbar is now open"2 points
-
Found it under userdata/addondata — made the change to my NFS path manually and it works. Matt - any chance to get a manual path entry on the addon since it appears that Kodi’s path browser isn’t working right with NFS? Thanks!1 point
-
I'm looking to see if there is a way to pick from specific bumper folders for some bumpers, based on the film metadata.... for instance, I have a theater intro that is themed to look like an 80's VHS style.... I would like that to automatically run if I pick an 80's movie..... for a 1920's movie, I have a "classic hollywood" style theater intro, that I would like it to run. I know I can set up separate preroll profiles, but I would ideally like it to be a little "smarter" and beable to set some bumpers based on the metadata, to make the experience more immersive.1 point
-
Famous Movie Visitors (2020 Walmart) View File Submitter Matt Submitted 04/14/2023 Category Commercials1 point
-
1 pointView File Christmas Trivia This themed deck of trivia slides is for a selection of Christmas movies and TV specials The Multiple Choice slides can be used with glow sticks to make this deck interactive for your guests. The deck includes a number of slides from several different categories including: Multiple Choice 20 Quotes 12 Additionally, there is a second file in this download that includes the templates used so if you are so inclined you could make some more. Submitter Polargeek Submitted 02/04/2023 Category Trivia1 point
-
View File Wes Craven's: New Nightmare This themed deck of trivia slides is for the 1994 New Line Cinema film, Wes Craven's: New Nightmare. The deck includes a number of slides from several different categories including: Facts 10 Multiple Choice 20 Question & Answer 20 Submitter Polargeek Submitted 02/04/2023 Category Trivia1 point


This leaderboard is set to New York/GMT-04:00