Creating Actions for Philips Hue Lights and Getting Setup (Guide)
- Replies 5
- Views 5.9k
- Created
- Last Reply
Top Posters In This Topic
-
ammonrose 3 posts
-
MidnightWatcher 1 post
-
NightWatcherTheater 1 post


Popular Days
Most Popular Posts
-
Great thread for Philips Hue users. For anyone who wants to call up scenes in your sequence, just first create the scene using the Philips Hue app and then use the action file to call up that specific
-
I forgot to include how to create actions for groups instead of having to change each individual light. It's as simple as copying/pasting this: http://<bridge ip address>/api/<username>
-
Here are some action files that I've created that you are free to download. I have kept them as a .txt file so that you can easily edit them (put your bridge ip address in there along with the usernam
Posted Images

Featured Replies
Topics
-
I've just upgraded my Kodi to the latest version 21.3 and switched from CV to PSE. If I run PSE using a sequence with Trivia in it, it will work once. Then if I run it a second time it Errors out saying "PreShow Experience Error. See the log for more information". If I "Reset content database" it usually fixes it but just re-breaks after working once. The error portion of the log is below. It seems related somehow to trivia because the issue goes away if I omit Trivia from my sequence. At first
-
THX - Sphere THX Sphere Trailer in 4K with 7.1 Audio in Dolby TrueHD and Dolby Digital Plus (secondary track). File Information Submitter ToastyMaster07 Submitted 04/07/2026 Category Audio Format View File
-
Announcing the release of Kodi 22 “Piers” Alpha 3! Usual words - the step from 21 to 22 is a major release, but it’s also an Alpha at this stage, so you’re going to get some bugs as well as funky new features. That is, of course, a major part of the point of early release software: please raise Github issues with full debug logs to help us resolve any regressions you wonderful testers come across. Okay, what’s new in this version? Changelog Release highlights Added support for taglines in
-
So, here we are, back in the roo atm after a day of sidebar meetings, coding, hacking, experimenting, and general conferencing. Time for some more structured sessions, starting with some of our partner projects. Chewitt started us off with an overview of LibreELEC: hardware updates and changes, new chip set support, some challenges with older SoCs, plans for standardising e.g. kernel trees more, and so on. He also covered topics such as the challenges around supporting set-top box DVB tuners, p
-
Well, hello everyone! It’s that time of year again, when your favourite development team rouse themselves from their long winter slumber and emerge, blinking in the light, to reconnect with their fellow creatures. Welcome to DevCon 2026! We’re coming to you this year from about an hour outside Barcelona, which makes this a return visit. Not that it matters, I guess; you probably know how this works by now, so let’s get straight in … As seems to be tradition now, we kicked off with a round of r


What You'll Need:
Philips Hue Bridge
Philips Hue lights (make sure they are already connected within the Philips Hue app)
Finding Your Bridge's IP Address
2. Tap on "My Hue System" at the top
3. Tap on the information icon to the right of the bridge
4. Your IP address will show at the bottom
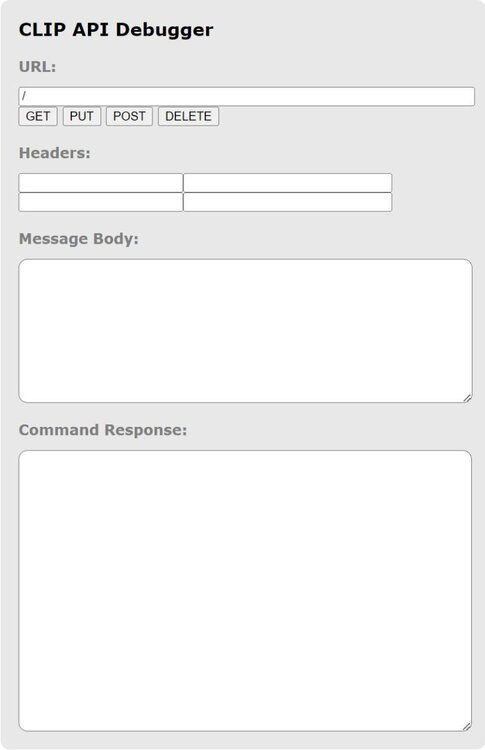
Using the CLIP API Debugger
1. Now that we have the bridge's IP address you will need to make a new tab and input it into this URL:
A Debugger interface will show up
2. We will not be able to do anything until we obtain our unique username (aka an authorized user) so input this into the debugger
/api{"devicetype":"my_hue_app#iphone peter"}3. Click on "POST"
You will get back an error message which is completely normal. It's Philips Hue's way of security to prove that you have access to your bridge
4. Press the button on your bridge and click on "POST" again
Congrats! You've just obtained your unique username!
5. Copy that username and paste it into Notepad (or a similar program). We'll be using it in everything we do from here on out
Changing the lights (ON/OFF, Color Loop, Change Color)
1. In the debugger copy/paste this into the URL:
2. Click on "GET"
This will show you the state of your lights. If they're on, their color (hue), their saturation (sat), their brightness level (bri) etc.
3. Now let's have some fun. Look for the light you want to change (it has a number). In this case we'll choose the first one which is number 4. Copy/paste this into the URL:
4. Now copy/paste this into the Message Body:
{"on":true, "sat":255, "bri":255,"hue":22070,"transitiontime":20}5. Click on "PUT" and watch the magic happen!
Here are a few definitions to understand what you can change:
On
true = The lights will turn on
false = The lights will turn off
Saturation (sat)
Determines how saturated you want the color you've chosen (255 is the most saturated (colored) and 0 is the least saturated (white))
Brightness (bri)
Determines how bright you want your lights. You can choose from 0-255 (0 does NOT turn off the light, 255 is the brightest)
Hue
The color your light will show (16 million colors to choose from according to Philips Hue)
Transition Time (transitiontime)
This is how long it takes for the command to take place in seconds (10 = 1 second, 20 = 2 seconds etc.)
Effect
You can only choose one effect which is color loop. If you want to add that effect just copy/paste
"effect":"colorloop"If you want to stop the effect then replace "colorloop" with "none"
If you want to check out more definitions then go here. You will need to create a Philips Hue Developer account.
6. Now that you know how to check the state of your lights, you can go into your Philips Hue app, change the lights to whatever you want, then use the URL https://<bridge ip address>/api/<username>/lights to figure out their hue, saturation, and brightness. You can then use the Message Body {"on":true, "sat":255, "bri":255,"hue":22070,"transitiontime":20, "effect":"none"} and change whatever you'd like. Feel free to remove the effect statement entirely, feel free to change the transition time. The worlds your oyster!
Saving Actions and Place Into PreShow Experience
Now that we have a handle on how to have the lights behave the way we want to, let's save them in a format PSE can understand
1. Open Notepad (or a similar program) and copy/paste this into it:
SOMETHING VERY IMPORTANT TO UNDERSTAND:
Notice how the URL we are saving into Notepad DOES NOT contain an "s" in http. The debugger tool requires you have https in the URL, but PSE requires you remove the "s" from it. Keep that in mind.
2. In this scenario we are having multiple lights change. You can add as many actions as you want, but remember to have a space in between each one like the example above. I'll show you how to change an entire group after this example.
3. Change the sat, bri, hue, transitiontime and whatever else to whatever you'd like and then click Save As
4. In your title type the name of the file (name it whatever you'd like) then add the extension .pseaction. Change the file type to "All Files"
5. Place the new file you just saved into the "Actions" folder of the PSE file structure.
6. Now you can insert an action in the Sequence Editor and you can also click "Test" to see if it works.
Adding Automatic Actions When You Press Pause, Resume, and Abort (Stop)
1. When you are in the PreShow Experience Sequence Editor go to the Settings Menu
2. Go to the left hand side menu and go to "Actions" at the bottom
3. This is where you can choose what action you want for when you Pause, Resume or Abort
Hopefully this guide has helped to get you started. I know it's not completely comprehensive, but feel free to input your opinions, suggestions or questions! I'd love to hear what people have done, or are in need of.
Edited by ammonrose